Showing posts with label eCAL. Show all posts

Thursday, June 27, 2013

Katie's Candy Bar Tower

I know I said I would be posting more often.  I'm sorry.  It's been kind of tough waiting for my son to finish up training, then going to get him up in Missouri and then taking him back to get on a plane for Japan.  Yes, Japan.  That hit me like a ton of bricks, which is why he probably waited until two days before we went to get him to tell me that was where he was being stationed.  Stinker.

Anyway, I've been deep cleaning and purging as well.  Both are things I never get to during the school year.  Summertime is my catch up time for cleaning.  It was supposed to be my catch up time for crafting........grrrrrr.


This project is an older one.  My daughter got a job about three months ago that she just loves.  I made this to celebrate her first paycheck.  It's called a "cookie tower" and can be found here.  This lady is an svg box genius, ya'll!  

My daughter loves Payday bars so it worked out perfectly.  Paydays for payday.  lol  I put 5 of them in there and had room for another 1 or 2 more.  It's designed to hold about a dozen standard-sized homemade cookies.  Isn't it cute?


My daughter is a true country girl and will probably wear a denim wedding dress. lol  Maybe not.  She loves denim and bandanas and anything rustic so I used a chocolate brown paper I had gotten from Michael's during one of their 8 for a$1.00 sales.  It's finely textured and gives a little bit of an elegant-rustic feel to projects.  I usually snag every bit of it they have.  Sorry!  The patterened paper and the ribbon also came from Michael's.  The paper is just off their racks-no kits or paper packs.  The twine came from a military surplus store my son loves to visit when he's home.  It was much thicker than what you see so I just pulled the fibers apart to make it thinner and easier to manage for a small project.  The tag, I think, came from my eCAL software.  I'm not a hundred percent sure.  If it didn't, then it was a free download from someone's blog.  I'm almost ashamed to admit this, but when I got my Eclips the Christmas before last, I was so happy and taken with it, that I barely slept for three days, searching for free downloads, perusing, and downloading tons of free svg's.  Then I cut all kinds of templates that I keep in a storage container so that I can look at them to visualize future projects and get ideas.  My husband had to put me on lockdown so that I could go back to work after Christmas break and be able to function.  It was worth it!  Anyway, I could have gotten that tag from anywhere is what I was trying to say.  lol
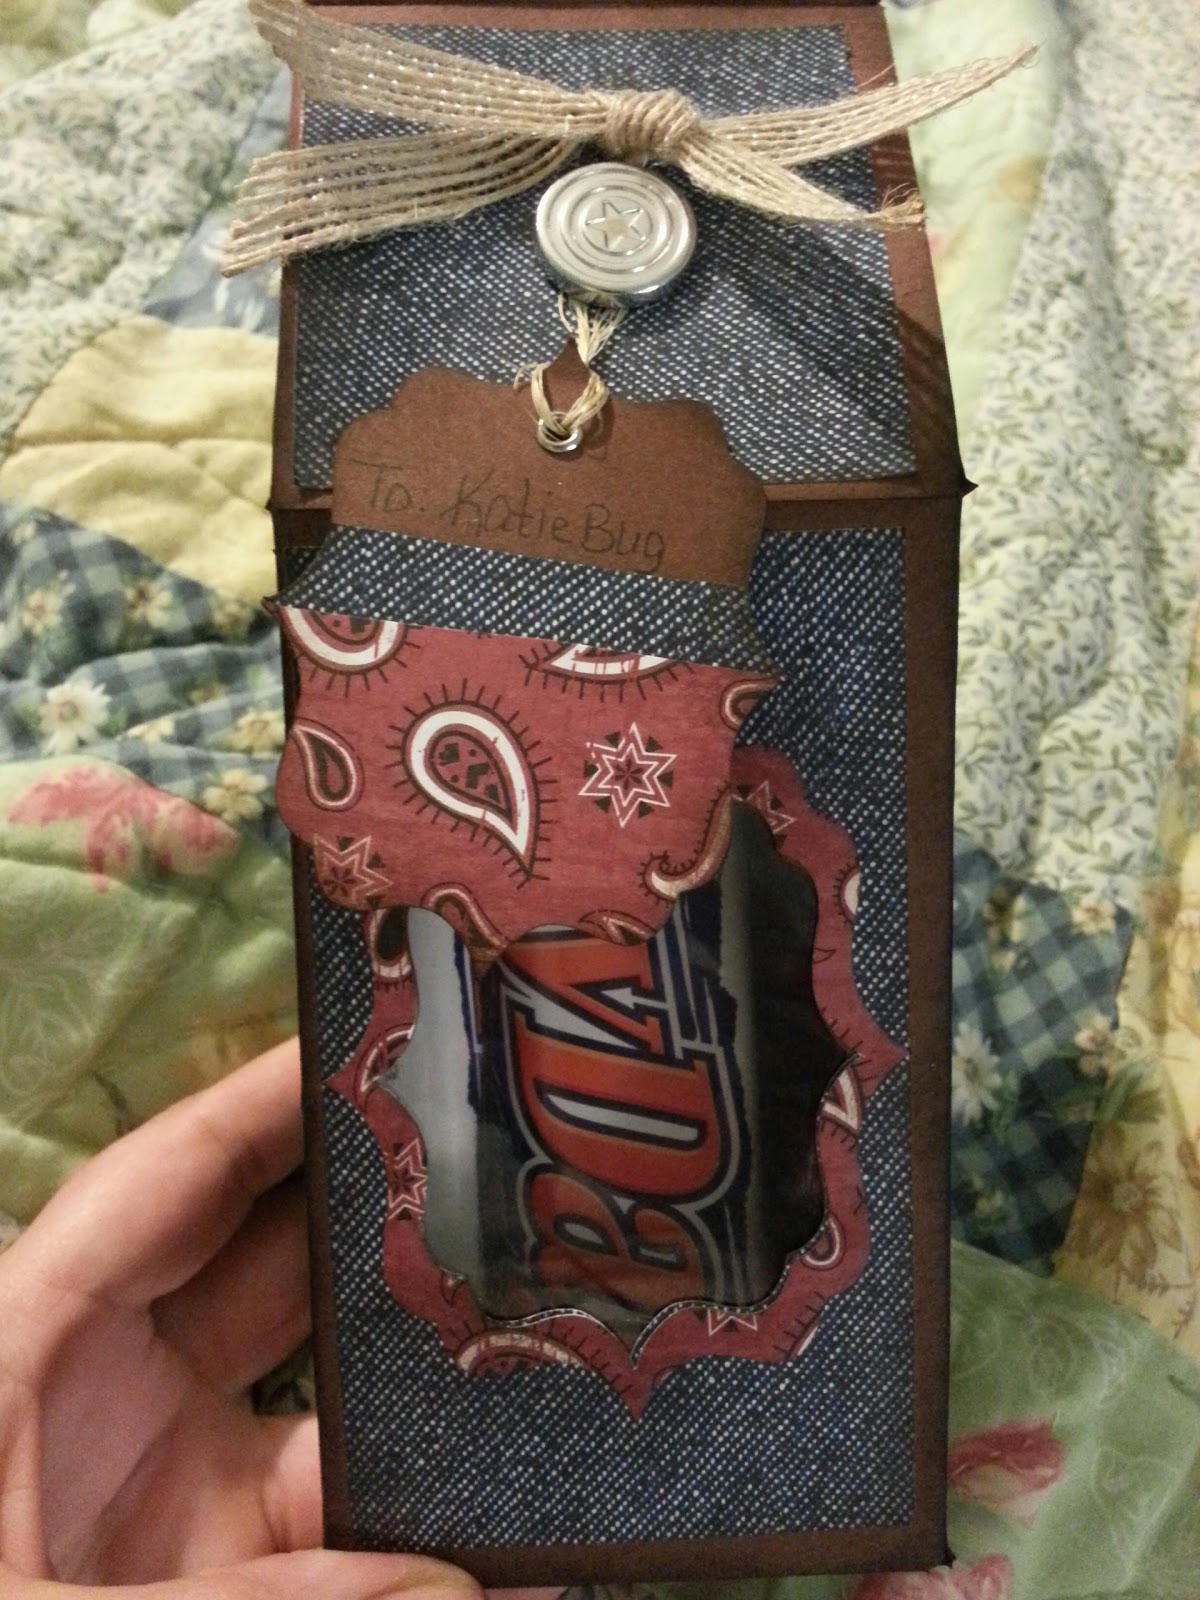

To make the frame, I cut the tag regular size and as a shadow from the bandana paper.  I used the cut-out from the brown paper to make the tag.  I also cut it from denim and bandana in the same size and then trimmed down to fit on the tag itself as a simple embellishment.

The window is plastic cut from Cricut cartridge packaging.  I just cut out a small rectangle and red-sticky taped it on the inside.  I do have transparency sheets, but I tend to keep plastic packaging for stuff like this, where I only need a small piece and need it to be sturdy.  Waste not, want not!  (You can clean it so food can touch it.)

Quick tip:  Cut another cookie tower out of wax paper (swipe your blade with Goo-gone before cutting to avoid waxy residue building up on your blade) and then glue to the inside of the box before assembling.  That way, oil from the cookies doesn't seep through and ruin your design and you can still see the delectable treats inside the box.

By the way, I'm linking up over at D.L.ART.  Go on over and check out all of the cute projects and link up one of your own.  :)  

Wednesday, April 17, 2013

Quick Gift for the Bestie

My best friend is a math teacher and our state standardized test (FCAT) for math was this week.  I added vinyl and candy to this jar to give her something she could treat her hard-working students with.  So super easy and so super cute!  :)

Sunday, April 14, 2013

FCAT Treats for my Students

I just had to make something for my little sweeties for tomorrow.  They are taking their state standardized test on math tomorrow and some of them are really nervous.  I believe on making the best of situations so I thought this would help them a little.
I used my Sizzix Eclips and eCAL. 

The pants were made by merging 3 rectangles together.  

So super easy!  They're going to love them.  :)

Friday, January 4, 2013

Split Monogram Vinyl on Tile

This is what I made for my best friend (and her husband) for Christmas.  I had to wait to post it, because I wasn't able to give it to her on Christmas like I had planned.  I had those horrible vinyl issues that set my timeline for gifting back.  Strangely, we haven't seen each other since Christmas night.  Normally, we would have had at least one sleepover by now, but she's dealing with some stuff with her parents, and I've been crafting like a beast and burning up the miles on my new treadmill.  Anyway, we went back to work today so I just walked the four doors down from my classroom where her classroom is to give it to her.

Saturday, December 29, 2012

Dressed up Jars with Homemade Mixes

I feel like I have really accomplished something today!  I found this great blog on Pinterest (What are the chances, right? lol) that has these mix recipes for things I use store-bought mixes all the time.  Bonus idea:  she keeps her mixes in these jars I've been buying from Hobby Lobby on 50% sales.

The first mix I put together is the corn bread mix.  Then,while a batch was baking up to go with our soup this evening, I did the pancake mix and the quick mix (aka: Bisquick).  Now, I wasn't able to follow her recipes exactly.  I wasn't able to get unbleached flour.  We live in an area with limited access to some ingredients and we were sold out of unbleached flour.  All those holiday bakers!  Harumph!  Just kidding........  By the way, I added a minced jalapeno pepper to the corn meal batter before baking it.  I think I'll add two next time.  We could taste it, but it wasn't quite enough for our taste.

The blog I found the recipes at is called Heart, Hands, Home, and here are my versions of the jars with mixes.  (The cocoa mix is store-bought, but I have a mix recipe from another blog I'm going to try when this is gone.)  My last mix will be the brownie mix.  I need another jar........

Anywho.....sorry about the lighting

 
I used eCAL and my Sizzix Eclips to make the labels.  I got the froo-froo swirly cut file from My Vinyl Designer.  It's in one of their freeby files.  I think it was freebie number 3.
 

I was so frustrated when I was cutting these.  I ended up using three sheets of black vinyl before I stumbled on this great tipI'll get to that in a minute.  I used a new blade, but after cutting two of these, the blade kept tearing through the swirlies on the others.  I tried everything I could think of but had to keep pulling pieces of vinyl off the blade before it occurred to me that the adhesive from the vinyl might be building up on the blade.  I decided to smear Goo Gone on to the blade before cutting again.  I already had my machine set to 1 pressure, 1 speed, and 2 depth, which is the Eclips' version of the "kiss cut" for vinyl (not the preset settings in eCAL), but it wasn't until after I used the Goo Gone that the cuts came out perfect.  Good to know. 
 

I decorated the lids with some pretty paper I got from Walmart to do my wedding album in.  I also glued one of those little library book pockets to the back of each jar to keep the recipes in and decorated those with the same pretty paper.


Two topics for the price of one:  I baked the cornbread in a dish I etched my initials into.  I chose several dishes that I typically take to potlucks/church dinners and etched my initials into one and the words: faith, believe, hope, and love onto the others.  This way I have a variety of dishes to take and I always know which dish is mine without having to put a sticker on it.  


I've done several with initials as gifts, too.  They go over really well for bridal showers (Brides love to see their future initials etched into a casserole dish).

Wednesday, December 26, 2012

Inspirational Tile with Vinyl-Romans 1:16

Looking for something to give my father-in-law for Christmas, I came across this file on My Vinyl Designer.  They are an AWESOME source for svg files that can be used on so many projects.  Check them out. You won't regret it. 

It turned out so pretty.  He loved it!  :)

Monday, November 19, 2012

Classroom Bulletin Board

I like to carry over my crafty-ness into my classroom to make it more homey place for my students.  It also looks more organized when it's decorated in a uniform way.

I used printable, digital paper that I bought from MyGrafico.  I really like it.  I have used it for several different things.  Sometimes I just print it out and cut it for a project like the bulletin board and the organizer caddy.  Other times I arranged it digitally using either Microsoft Word or Publisher and then printed it out like the signs on my white boards.  

I know what you're thinking.  "Doesn't it cost a lot to print the paper out?"  Actually, it doesn't cost any more than buying paper as far as I can tell, and it's so much more versatile.  Also, have you ever spent a lot of time trying to find a great paper for a project and then there isn't enough of it?  This way, you print what you need.  If you have SCAL or eCAL, you can fill a shape with the digital paper patterns and then print-to-cut for your own personalized embellishments.  Awesome, right?

Don't get me wrong.  I'm all about some scrapbook paper, but this just gives you another option and a little more freedom in some of your projects.
 
This is the district's theme this year.  I'm working on another bulletin board that's all about me and it's going to say "Know me, Learn from me."
There are actually words on my word wall now.......


The words were cut using the Curlz font on my Eclips.  Oh, that reminds me!  Another cool tip is one I learned from Pinterest.  The silver staples were really standing out on the black letters and killing the effect.  I learned that you can use Sharpie paint pens to paint the staples before putting them into the stapler.  Who thinks of these things?  Geniuses, that's who!  Not me........  I painted a row of staples black and re-stapled.  Now you can't even tell they are there unless you look really close.  Some of my students have noticed it, though, and have asked me, "Mrs. Kinkey, did you know your staples are black?"  I just looked at them innocently and said, "No, I didn't know that.  What a convenient coincidence." You can imagine the eye-rolling that took place.....

Sunday, September 30, 2012

My First Blog Post Ever!

Okay.  So, I created this blog so that I could enter a contest on one of my favorite blogger's site.  One of the requirements was that you had to have blog-not necessarily one that you had actually posted on.  I thought, "I can do that."  As I was creating it, I thought it would be cool to really have my own blog one day-for real, but who has time for that?  (Thousands of people do, apparently. LOL!)  Anyway, over the last year, I have noticed that my favorite craft bloggers are posting fewer and fewer projects and, I'm still craving creativeness.  Then it hit me that others might be feeling the same way, and I have a craft blog so maybe I can add to the world's craftiness and pick up where some of my faves have left off.  Maybe I have something to share that someone else would be interested in.  Let's find out!  :)

My first post is going to be about what I have been working on over the past couple of weeks.  My youngest son, my baby (sniff, sniff), is leaving in a couple of weeks for Marine boot camp, and we had a 5th Sunday dinner at our church this morning.  I had asked the church if it would be okay to include a "send-off" for him into our church dinner and they said it would be fine.  We're a pretty close church family so I new it would be.  :)  I have spent the last two weeks planning and making all kinds of cute stuff based on ideas that I got from other crafters' sites and YouTube.  Where I can remember the original locations, I'll link you up with them.

One of the first things I decided to work on was some patriotic cards that I could send my son throughout his time at Parris Island.  I also decided it would be great if he could hear from some of our church family from time to time as well.  So I decided to make little note cards that can be included with my notes to him.  I laid them out on the tables in the fellowship hall along with some pens so that friends and family could write a little message before they left this afternoon.  It went over very well.  Here is the first card I'm going to be sending along with some of the blank note cards.  The base paper for the card and note cards is Very Vanilla from Stampin' Up.  My dealer, I mean my demonstrator is Lisa Marie Smith and she's awesome!  She's from Crestview, FL so if you're local and looking for a fun time, get some friends together and arrange to do one of her classes.  I have linked her Stampin' Up site to her name above.  You can also just order from her online if you live too far away for a class.


Another project is a tile with vinyl lettering.  I love, love, love this one!  I got the tile from Lowe's for less than a dollar and the vinyl is from The Paper Studio.  I got it from Hobby Lobby.  (I seriously love Hobby Lobby!  You'll see that I get a lot of my supplies from either them or Lisa Marie.)  I'm not sure I like that vinyl for this project, though.  It works okay on glass and other surfaces, but it was really hard to get it to stick to the tile.  I think I'll stick with Oracle for tile projects from here on out.  A great place to get craft vinyl in all kinds of colors and styles is the Vinyl Super Store.  Her prices are great!  She had an eBay store at one time, but I don't know if she still does.  I got a great deal on a whole bunch of vinyl from her on eBay once and now just order as I need from her regular store site.  The actual cutting file is an SVG file that I bought from My Vinyl Designer.  It's PA019 and it was ONLY $1.95.  Doesn't it look just awesome!?!  Whoever designed it did a wonderful job.  :)  I have bought several of their designs and buyer's remorse never visits my craft room after a purchase from them.  I used my Sizzix Eclips (that my ever so spectacular husband bought me for Christmas last year) and used eCAL, which is the Sure Cuts a Lot version made especially for the Eclips.  Both the Eclips and eCAL were purchased from Oh My Crafts.  I do have a Cricut Expression, but I highly recommend having more than one means of cutting shapes for projects if you're dealing with Cricut since they're so picky about having to use only their cartridges.  I have a ton of their cartridges, but sometimes you just need one shape and don't want to have to own a whole cartridge just to get it.  You can get free cut files all over the Internet or purchase some for a small fee from some really talented people who don't care what you use to cut their designs with.  (Can you tell I have a soap box handy to stand on when I talk about this topic? LOL) 


Wow!  This is a REALLY long first post.  Apparently, there has been a blogger inside me screaming to get out for a long, long time.  I promise future posts won't be quite so long.  How could they be?  There won't be much left to share when I get done with this one.  ;)  

Just a couple more projects to go.  I'll make it quick and painless, I promise.  The first one is one I saw on Pinterest.  I can't remember what it was called, though.  I visited the blog site but forgot to save it.  I'll try to find it and share it in a future post.  She has some really cute stuff.  She had mason jars with treats in them and these really cute layered stars hanging from the lid in rustic Christmas paper.  I decided to make some stars like hers with the same paper I had used for the cards and notes. Here is what I did with them.  Aren't they pretty?


One of my favorite crafters is Diane Hill.  You can find her fantastic videos on YouTube and/or visit her site paperpastime.blogspot.com.  She's phenomenal!  (manamana do do do do do manamana do do do do)  Sorry.  Channeled the Muppets there for a second.  Anyway, one of her videos is about making barn stars with scrapbook paper.  The ones she did were in solid colors, but I decided to use the same scrapbook paper that went with my patriotic theme and they turned out so great!  Thanks, Diane!  You don't know me, but I am a huge fan.  That's not creepy, is it?  :)


Last but not least............my favorite project, because it was the MOST FUN to make!  The rosette wreath.  (cue trumpets daah da da daaaaaah!)  I got the idea from Pinterest and then checked out videos on YouTube for how to make the best rosettes.  I had made a couple in my Stampin' Up hostess class last year about this time.  I loved them so much that I kept them in the forefront of my mind this WHOLE time looking for a project where I could use a bunch of them all at once.  Someone pinned this adorable wreath in spring colors for Easter over the summer and an idea was born.  I was going to do a Fall wreath for my mother-in-law's birthday, which is coming up this Thursday.  A hem (cue sheepish look).  I don't think I have the energy to do it now after all the crafting I've done the past couple of weeks.  I am a middle school science teacher, and 9 weeks' exams are coming up so my focus needs to shift back to non-craft related topics for the next week or so.  Who knows?  I might come in from work tomorrow evening bright-eyed and bushy-tailed looking for some paper to score and fan-fold.  Stranger things have happened.  LOL!  Anyway, I used the same gorgeous patriotic paper that I have used throughout.  By the way, I don't think that I mentioned that the patriotic paper I've been using is from The Paper Studio, which is probably my favorite line of scrapbook paper in the entire world.  No, I haven't seen ALL the paper in the ENTIRE world, but I think that if I had, I would still love The Paper Studio's paper best.  I'm never disappointed in the quality of the end product when I use their paper.  Running a close second (a very close second) is Stampin' Up paper.  The colors are so pure and I love how their scrapbook designer paper matches with their inks/markers/plain paper colors/ribbon/embellishments.  You can't go wrong with either brand.  I've lost my train of thought...........oh, yeah!  The rosette wreath!  Isn't it pretty?  I'm just in love with it!  It looks really good with those barn stars, too, doesn't it. 


So thanks to all the great crafters that gave me these wonderful ideas to work with and to the great craft supply companies that give us so many wonderful products to work with and my awesome husband, who puts up with the sounds of my paper trimmer, Cricut, and Eclips during his favorite television shows.  You have helped me to put together a fantastic collection of projects that we can all enjoy.

Okay.  So, I broke my promise of a quick and painless finish to my first post.  Well, I hope it was at least painless if not quick.  Thanks for visiting........I hope someone visits...........and doesn't give up when they see how long it is.................and comes back for more...........<3