Sunday, April 14, 2013

FCAT Treats for my Students

I just had to make something for my little sweeties for tomorrow.  They are taking their state standardized test on math tomorrow and some of them are really nervous.  I believe on making the best of situations so I thought this would help them a little.
I used my Sizzix Eclips and eCAL. 

The pants were made by merging 3 rectangles together.  

So super easy!  They're going to love them.  :)

Saturday, February 23, 2013

Let's Encourage Each Other


This is a card that I will be giving to someone special (who will not be named, because she might read my blog and will see this before she gets it) who needs some encouragement.  When you have a lot going on in your life, it's nice to get a little note to bolster you up so that you can deal with it all.  People don't really do that anymore.  We all have so much going on that we don't take that time to send a little something to someone else.  If we all did, then we would all be getting something special here and there that would really help us deal with the stresses in our lives.  Let's share the love!  :)
 

Everything for this card came from Stampin' Up! except for the patterned paper, which came from a friend, who thinks she got it from Target.
 
Paper:  Very Vanilla, Old Olive and Melon Mambo (I think)
Ink:  Old Olive, Pumpkin Pie, and Pretty in Pink 
Stamps:  Flower: True Friend; Inside Sentiment: Whimsical Words
Bling:  I can't remember what they are called officially, but I call them blingy brads.  :)

Friday, February 22, 2013

Something Simple to Dress Things up a Little

Just a quick post to show what I did with some inexpensive decor items I had bought awhile back.

I got the cans from Michael's.  They were 80% off and came to almost exactly what I had left on a gift card I had received for my birthday.  I got the little basket from Target in the $1.00 bin.  All I did was color some plain bling with an aqua Bic Mark-it and then stick them on.  It added that little something extra.  On the basket, I used E6000 to glue some ribbon and a bow that I had made onto it and then added a large bling.  I put marbles in it to weight it down and I use it as a pencil cup in my classroom now.


Thursday, February 21, 2013

I'd Forgotten I Made This Card


This was one of the first cards I ever made about 4-5 years ago.  I was sorting through some pictures on Facebook and came across this one.  I love this card even though I made it when I was just an inexperienced, card-making baby.  The colors are so great together, though, aren't they.  How did I manage that?  Seriously, you should see some of the cards I was so proud of at the time.......and can't believe I actually took pictures of.  lol

Promise you won't tell where I got the paper........you'll never believe this.......Dollar Tree......shhhhh!  It'll be our little secret.  Can you believe how cute it turned out with a pack of $1.00 scrapbook paper?  The base paper came from Michael's, but the rest is from the Dollar Tree.  The stamp is from Stampin' Up! I think it was a hostess set, but I'm not sure.  I'm not at home where I can check just now, but I will later and add it in.  :)

Monday, February 18, 2013

Great Little Gift to Have on Hand

Sometimes you want to have a little something to give someone as a thank you or a pick-me-up.  A great gift idea is a mini composition notebook altered with some pretty paper, ribbon and bling.  Everyone needs paper to jot things down from time to time and these are the perfect size to fit into a purse or tote bag.  :)  You can write a special message on the first page so the recipient is always reminded of how important they are to you.  The gift that keeps on giving!


 Some of these little guys came from Walmart and some came from Staples.  I did the one that says "My Notes" a couple of years ago and then "lost" it among my craft supplies during a move one storage area to another.  I can't remember which Cricut font I used, but I think it might be from Lyrical Letters.  The others I made more recently.  I haven't decided if I want to do a stamped label on the ones that don't have anything but bling and ribbon or just leave them as is.  I think they're cute like they are, really.  What do you think?

By the way, the black and white paper is from a Walmart paper pack that I've used before in some of my other posts.  The brightly colored squares and stripes is from Michael's.  The other paper is from Stampin' Up!, but I can't remember the name of it.  I think it was part of a mini catalog collection.

I think I'll share this one at D. L. Art as well...... 


Sunday, February 17, 2013

Totally Stole This Idea!

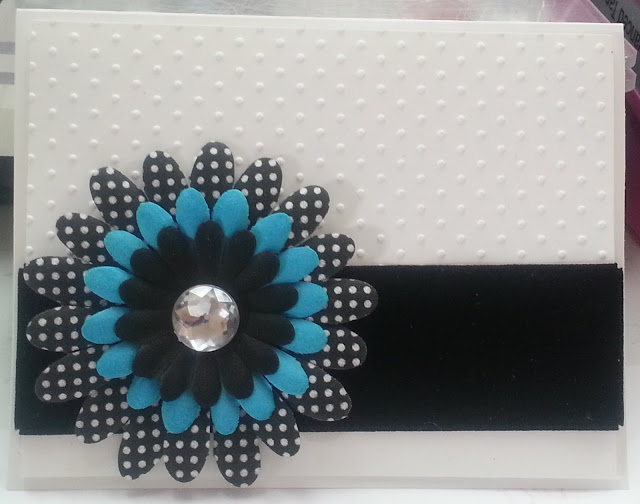
One of my favorite bloggers is Robyn over at My Pink Stamper.  She did this card awhile back that was just so simple and elegant that I had to do some for myself.  I left off the sentiment so that I could add them later as needed, but here is my version.  If you click on "My Pink Stamper" above, you will be taken to the video tutorial she did.


The paper is Whisper White from Stampin' Up!  I did a 5.5" x 8.5" folded in half card base.  Then I embossed about 3/4 of a 5.25" x 4" piece of Whisper White. I affixed the velvet ribbon (from Hobby Lobby) onto it, using the "cheater method" from My Pink Stamper.  I use my ATG Gun instead of Scotch tape, though.  The flowers are from The Paper Studio at Hobby Lobby.  I bought a package of the black and white and a package of the pretty aqua and then mixed and matched them.  The bling came with the flowers.  I used hot glue to adhere the flowers.  Aren't they pretty?  I just love the ideas she comes up with.  They are so simple and always cute.

I'm linking this to DLART's Thankful Thursday Linky Party.  Go and check out all of the cute projects when you get a minute!  You won't be disappointed.  :)

Thursday, January 10, 2013

Something Pretty for a Sweet Lady

I am linking this project to Use it Tuesday's Challenge #47 "Make it Sparkle."  There is a ton of bling and sparkle in this project so I think it qualifies for sure.  I am also linking it to DL.ART's most recent anything goes Linky Party.  These are two of my favorite challenge blogs.  Check them out.  There are a TON of great projects featured there.  You get so many ideas and meet some new crafty friends along the way.  :)

I just HAD to have this tray when I first saw it at Hobby Lobby almost two years ago.  My hubby and I were on an anniversary weekend away in Daphne, AL (one of my favorite places in my small world), and I had printed out coupons for each of us for each of the 3 days of our stay.  I know.  We're wild and crazy and can't be trusted when we go off together. ;)  lol!  Anyway, I got it.  Then promptly become too intimidated by it to do anything with it.  It has been in my craft room causing all kinds of mischief ever since.  It always seemed to be covering up something that I needed, or sliding off the shelf onto my head when I tried to look for something.  Sometimes, it would be in a place other than where I thought I had left it.  Not as creepy as that weird clown doll in the USPS commercials, but it definitely had to be used.  

There is this sweet lady that works at my school, who lost her mother several years ago.  I got some pictures from her to make a memorial candle and decided to make this as well.  The candle will be in a future post since I am out of wax paper.  

Her mother loved the color burgundy, so I used the Mirabelle mat stack from The Paper Studio.  The papers are SO pretty!
 

 In this frame, I used some great epoxy brads from The Paper Studio that seemed made for this paper stack.  


I cut the letters from a lighter piece of paper from the paper stack and from a Cheerios box.  I used the Mod Podge to adhere the paper and box layers together and sponged the edges with Walnut distress ink.  Then, I spread Crystal Effects by Stampin' Up on it and sprinkled a tiny bit of Dazzling Diamonds over the letters to dress them up just a bit.  This was a first for me, and I'm so happy with how they turned out.


I used the "Faith, Hope, Love" stamp set from Stampabilities on a scrap of paper.  The ribbon is also from The Paper Studio.  (I'm thinking I should be president of their fan club.)  I can't remember the name of the company for the pendant, but I got it from the jewelry section at Hobby Lobby.  I originally did it with Crystal Effects over the picture, but I didn't like it so I pulled it out and redid it with just the picture.  

Sorry about the blurriness.  I didn't notice it until I had already taken the photo tray to school.  This is a scanned copy of something my friend had written on the back of one of her mother's photos.  I was so touched that I decided it needed its own tray.  I printed it on vellum and layered it over one of the papers from the stack.  The lattice punch is one I've had for a month or so.  I was so excited to find that punch and get it 50% off that I came home and punched out a piece of my favorite paper just to see the effect.  Then, I couldn't decide what to do with it so I set it aside to wait for the perfect project.  It was buried under other things, and I stumbled upon it looking for my adhesive eraser.  Perfect project indeed!  The die is from Spellbinders.


This is the most recent photo of my friend's mother.  I embellished with a brass bottlecap that I covered with a circle cut out of the same paper as the tray background.  I stamped the word "adore" and covered with Crystal Effects.  


I think the stamp is from Stampabilities, but I'm not sure.  (Packaging gets in the way so I usually toss it.)  The pearls are from Stampin' Up!


This is a really good picture, but I'm afraid I might have ruined it with too many pearls.  I used permanent adhesive to keep them from falling off in the humidity of our summers so I can't change it.  I hope she doesn't think I over-blinged.  :(
 

 The love my friend had for her mother was so obvious that I thought this sentiment would be perfect.  It's from the "Faith, Hope, Love" setI stamped it in Bravo Burgundy by Stampin' Up!  The tag is from Stampendous "Timeless Tags."  I stamped it in River Rock by Stampin' Up! and then sponged the edges with it as well.  I got the jewel from Hobby Lobby, but I can't remember who it's from.  I refer to it as "big, honkin' bling."

I meant to sponge the edges of all of the pieces with the Walnut distress ink, but I was so nervous and excited about this project when it all started to come together that I forgot until I had most of the pieces adhered down.  Oh well, I think it still turned out pretty.  :)

I hope it brings her comfort and she knows what an impression she has made on the lives of others as a result of her mother's love and nurturing throughout her life.