Saturday, October 19, 2013

Wedding Card Box

This is my first wedding card box.  One of my former students approached me about doing it.  I'd never done one before so I Googled it and got some inspiration from one of the posts.  I would love to link you to it, but I didn't save it (just a picture that I will share at the end when I figure out which computer I saved it on). I'll try to get pictures of it set up at the wedding with the décor and everything.

I used my Eclips to cut out a free font I downloaded from the Internet.  The swirls, I believe, came from myvinyldesigner.com.


Not bad for a first attempt.  The boxes came from Hobby Lobby and were very hard to cut with my hobby knife.  My husband is buying me one of those little handheld rotary saws.  There is a sanding attachment, too, so I can whip through my wood projects easily as well.  :)

I'm linking this to D. L. Art's Linky Party.  Visit to check out some great projects that link to some really great craft blogs.  :)

Saturday, October 12, 2013

Pearls? Nuh uh!

 Some of you probably already know about this trick, but the rest of you should probably sit down.  This is mind-blowing!  :)
 
See these pearls in this picture?  Well, those aren't pearls.  They are hot glue dots covered in PearlEx Powered Pigments.  Yes, I said hot glue dots.  Watch this video for the details.  I don't have a fine tip on my glue gun like she does, but I think I will get a glue gun that has a tip like that.  I had a lot of trouble controlling the "glue webs" and you can see the irregularity of the 'pearl' on the right.
 
Whoever discovered this for the first time, THANK YOU!  :)
 

Friday, October 11, 2013

Friendship Card

I have been away too long.  I have missed coming here and sharing my fun projects.  I have a lot of them still to share, but I just haven't made the time to sit down and get them posted.  Tomorrow is my monthly crafty day so I'll work on getting my projects organized and getting some pictures taken to share.  In the meantime, I found this recently in my blog photo collection.  Honestly, I don't remember all of the details.  I know the punches came from Stampin' Up! as well as the paper.  The ribbon, I think, is from Michael's.
 
I cut the card base as a normal A2 card and then trimmed about half an inch off make room for the scallop border.

Update:  Guess what I stumbled upon in my craftroom first off today?  You're so good!  You're right!  It was this paper.  It is from Stampin' Up!, and it's called Springtime Vintage.  All Stampin' Up! Papers are two-sided and this is the front and back of one sheet.  The stamp is from a Stampin' Up! set called Wings of Friendship.

Thursday, June 27, 2013

Katie's Candy Bar Tower

I know I said I would be posting more often.  I'm sorry.  It's been kind of tough waiting for my son to finish up training, then going to get him up in Missouri and then taking him back to get on a plane for Japan.  Yes, Japan.  That hit me like a ton of bricks, which is why he probably waited until two days before we went to get him to tell me that was where he was being stationed.  Stinker.

Anyway, I've been deep cleaning and purging as well.  Both are things I never get to during the school year.  Summertime is my catch up time for cleaning.  It was supposed to be my catch up time for crafting........grrrrrr.
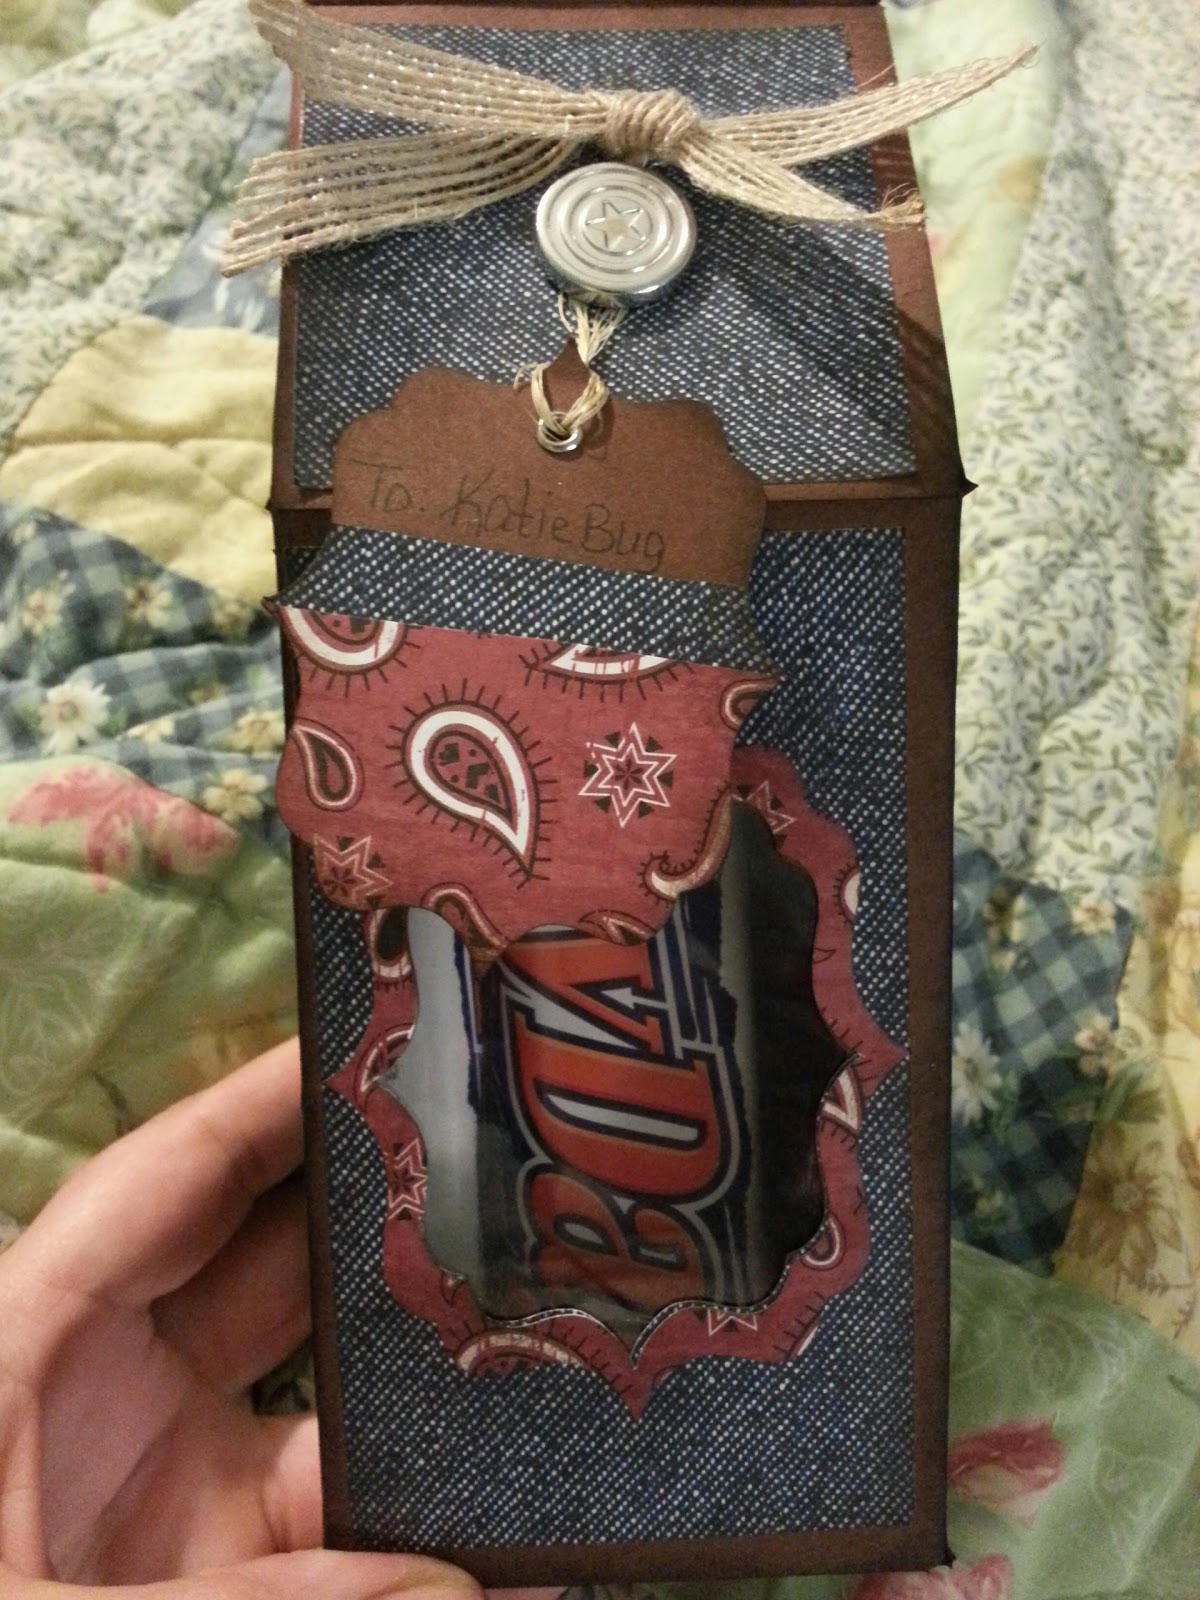
 

This project is an older one.  My daughter got a job about three months ago that she just loves.  I made this to celebrate her first paycheck.  It's called a "cookie tower" and can be found here.  This lady is an svg box genius, ya'll!  

My daughter loves Payday bars so it worked out perfectly.  Paydays for payday.  lol  I put 5 of them in there and had room for another 1 or 2 more.  It's designed to hold about a dozen standard-sized homemade cookies.  Isn't it cute?


My daughter is a true country girl and will probably wear a denim wedding dress. lol  Maybe not.  She loves denim and bandanas and anything rustic so I used a chocolate brown paper I had gotten from Michael's during one of their 8 for a$1.00 sales.  It's finely textured and gives a little bit of an elegant-rustic feel to projects.  I usually snag every bit of it they have.  Sorry!  The patterened paper and the ribbon also came from Michael's.  The paper is just off their racks-no kits or paper packs.  The twine came from a military surplus store my son loves to visit when he's home.  It was much thicker than what you see so I just pulled the fibers apart to make it thinner and easier to manage for a small project.  The tag, I think, came from my eCAL software.  I'm not a hundred percent sure.  If it didn't, then it was a free download from someone's blog.  I'm almost ashamed to admit this, but when I got my Eclips the Christmas before last, I was so happy and taken with it, that I barely slept for three days, searching for free downloads, perusing, and downloading tons of free svg's.  Then I cut all kinds of templates that I keep in a storage container so that I can look at them to visualize future projects and get ideas.  My husband had to put me on lockdown so that I could go back to work after Christmas break and be able to function.  It was worth it!  Anyway, I could have gotten that tag from anywhere is what I was trying to say.  lol


To make the frame, I cut the tag regular size and as a shadow from the bandana paper.  I used the cut-out from the brown paper to make the tag.  I also cut it from denim and bandana in the same size and then trimmed down to fit on the tag itself as a simple embellishment.

The window is plastic cut from Cricut cartridge packaging.  I just cut out a small rectangle and red-sticky taped it on the inside.  I do have transparency sheets, but I tend to keep plastic packaging for stuff like this, where I only need a small piece and need it to be sturdy.  Waste not, want not!  (You can clean it so food can touch it.)

Quick tip:  Cut another cookie tower out of wax paper (swipe your blade with Goo-gone before cutting to avoid waxy residue building up on your blade) and then glue to the inside of the box before assembling.  That way, oil from the cookies doesn't seep through and ruin your design and you can still see the delectable treats inside the box.

By the way, I'm linking up over at D.L.ART.  Go on over and check out all of the cute projects and link up one of your own.  :)  

Wednesday, May 29, 2013

School Bulletin Board

Here is the bulletin board I did for the end of the school year.  I'm really happy with how it turned out.


I used the Stampin' Up! In Color 12 x 12 paper pack 12-14 for this project.  All the colors went nicely with the background paper and color of the frame, I think.


I cut the crabs out at 3" from Create a Critter.  I think the shells were cut at 3" as well, but since they are an accessory they cut out just right for the crab to hold.
 

I used my Gypsy, and I have many fonts.  I can't remember which one I used right at the moment, but I'll look it up when I get back from New Orleans and let you know.  :)
 

On one side of the sea shells was the number of days left of school.  On the other, is a yellow layer that makes it look pretty.  As each day ends, I removed a sea shell from a crab, turned it over and stapled it at the bottom with the sea weed.
 
You'll never know how happy I was to take that last number down!  lol  I loved my students this year for sure, but it will be so nice not to have to be "on" all day 5 days a week (and when I see them outside of school in the afternoons and weekends).  I can relax a little and not have thoughts of lesson plans, tests/quizzes, missing homework, etc.  Oh yeah, and I can clean my house and bake something yummy.  I have time for Pinterest again!  Wow!  This is getting exciting thinking about it all.  lol

I'm including this on D.L.ART's page for the SPLASH Challenge.  The challenge implies anything "wet" so I think my bulletin board fits since the crabs are under the water.  :) 

Tuesday, May 28, 2013

End of Year Cards for my Students

Just wanted to post really quick to share the ADORABLE cards I made for my students for the end of the year.  I decided to dust off the ol' Cricut Expression for this project.  I have decided that I don't use it enough and need to start exploring my cartridges to see what I can make from them.

The cards are 3.5 x 3.5 using white cardstock from Walmart.  The paper is from my stash of "ugly" papers (the papers that get set aside because no one can think of anything to do with them).  These particular papers, I am embarrassed to share, have been in the back of my van for over a year, where they were placed in a box and left there.  That box is kind of an island of misfit scrapbook papers for me.  Although, I must admit, ugly paper isn't so ugly when you find the right project for it.  :)

The hippos were cut at 2".  I used the accessories as well (puddle and grass).  The inside of the card said, "Hippo Hooray!  We've had a great year.  Have an awesome summer!"  All solid colors came from Walmart textured paper packs.  The bling is from Stampin' Up!.

 
The monkeys were also cut at 2".  The green and black are from Walmart.  The brown was from Michael's (Recollections), and the tan is Creamy Caramel (retired) from Stampin' Up!.  The inside said, "It was fun hanging out with you this year.  Have a great summer!"  
The only thing missing is a stamp or printed sentiment of some kind.  I didn't have a stamp that would work and didn't have time for printing this time around.  I'll keep that in mind for next time.  

By the way, speaking of time, one thing I learned is that when making cards with layered designs, Xyron is the way to go.  I used 2 way glue for the monkeys and it took FOREVER.  I used my 5" Xyron for the hippos and saved tons of time.

The cartridge is Create a Critter.  I love how they turned out so much that I just bought Create a Critter 2 to play with as well.  By the way, keep on the look out for my next post, which was a bulletin board for the end of the year using the Create a Critter cartridge as well.  I'm going out of town-to see Wicked in New Orleans with my best friend-but I will try to post while I'm there if we have some downtime.

I'm linking this to Use it Tuesday for their Anything Goes Challenge.  Head on over there now to see other fun projects!  :) 

Monday, May 27, 2013

Thank You Cards for my Nieces

I'm so far behind in my posting.  I'm so sorry for that.  That last 9 weeks of school was a killer!  We did two major projects and then the end of the year crunch is always time consuming.  I'm going to be working on my crafting and blogging steadily over the summer, though, so that I can get into a routine that can carry over into the next school year.  I have been making some things and then saving them as drafts to post later so I'll have a lot of posts this week for you.  :)

My sister and I recently did the Expedition Everest Challenge 5K and Scavenger Hunt down at Animal Kingdom.  It was a blast!  We're both working on getting healthy and improving our lifestyles and doing fun runs like that turns out to be a great way to get motivated to do that.  Plus the sister bonding has been great.  :)  Anyway, she lives about an hour and a half away so we don't get together often to train together.  The first time we got together for training, my daughter came with me to watch the little girls and we stayed the night before the practice run so we would already be there the next morning and wouldn't have to get up and drive.  I am so not a morning person.  The little girls said we were having a royal sleepover and thought it was all about them, which was totally adorable, and partly right.  lol

These are the thank you cards I made for them for letting us come and have a royal sleepover with them.  The oldest one's nickname is Lilybug and the little one is the "Silly Little Monkey."  

I used a variety of Stampin' Up! paper and Walmart patterned paper.  The red is Cherry Cobbler from Stampin up!  The red polka dotted paper is from one of their Christmas collections.  I don't think they carry that one any more, though.  The black and white patterned paper is from Walmart's black and white 8.5 x 11 pack.  The black textured and white textured papers are both from Walmart.


The lavender and yellow papers are both from Stampin' Up!  The green polka dots are from Hobby Lobby and the patterned paper at the bottom is some I had in my stash from forever ago.  I probably got it from Michael's, because that's the only craft store I got patterened paper from back then.  

The lady bug and monkey are both blingy stickers I found at Hobby Lobby.  It was so perfect that they had something there for both girls at the same time that I just had to get them.  The cards were made around the stickers. 


I was hoping they would love them!  Look how happy they are!  My sister said she is going to frame them and make them part of their room decor.  Great idea!  I'll get pictures and add them when I go see them in a couple of weeks for our next practice run.  We're doing the Happy Haunted 5K in October.  Woot woot! 

She Did it Again!

The bestie has been busy again!  Just look at what she came up with.  What a heifer!  Now I've got to really pull it together to come up with something to compare to these gorgeous cards.  (Can you tell we're a little competitive?  Okay.  Maybe a lot competitive.  lol)  

She's starting her own blog, by the way, so I'll just give you the general down-low here and then add her link when she gets it up and running so you can get more detailed information on them.  I'm pretty sure all the colors are from the Brights collection from Stampin' Up!  The patterned paper is from the last catalog, but you could do these with the new patterns just as well.  The new paper is really great.  The stamp is also from Stampin' Up! and was carried over to the new catalog.  I loved these so much that I'm getting that stamp set this month at our monthly hostess party.  (You can order it here.)  Then I'll post what I come up with as well.


Wednesday, April 17, 2013

Quick Gift for the Bestie

My best friend is a math teacher and our state standardized test (FCAT) for math was this week.  I added vinyl and candy to this jar to give her something she could treat her hard-working students with.  So super easy and so super cute!  :)

Sunday, April 14, 2013

FCAT Treats for my Students

I just had to make something for my little sweeties for tomorrow.  They are taking their state standardized test on math tomorrow and some of them are really nervous.  I believe on making the best of situations so I thought this would help them a little.
I used my Sizzix Eclips and eCAL. 

The pants were made by merging 3 rectangles together.  

So super easy!  They're going to love them.  :)

Saturday, February 23, 2013

Let's Encourage Each Other


This is a card that I will be giving to someone special (who will not be named, because she might read my blog and will see this before she gets it) who needs some encouragement.  When you have a lot going on in your life, it's nice to get a little note to bolster you up so that you can deal with it all.  People don't really do that anymore.  We all have so much going on that we don't take that time to send a little something to someone else.  If we all did, then we would all be getting something special here and there that would really help us deal with the stresses in our lives.  Let's share the love!  :)
 

Everything for this card came from Stampin' Up! except for the patterned paper, which came from a friend, who thinks she got it from Target.
 
Paper:  Very Vanilla, Old Olive and Melon Mambo (I think)
Ink:  Old Olive, Pumpkin Pie, and Pretty in Pink 
Stamps:  Flower: True Friend; Inside Sentiment: Whimsical Words
Bling:  I can't remember what they are called officially, but I call them blingy brads.  :)

Friday, February 22, 2013

Something Simple to Dress Things up a Little

Just a quick post to show what I did with some inexpensive decor items I had bought awhile back.

I got the cans from Michael's.  They were 80% off and came to almost exactly what I had left on a gift card I had received for my birthday.  I got the little basket from Target in the $1.00 bin.  All I did was color some plain bling with an aqua Bic Mark-it and then stick them on.  It added that little something extra.  On the basket, I used E6000 to glue some ribbon and a bow that I had made onto it and then added a large bling.  I put marbles in it to weight it down and I use it as a pencil cup in my classroom now.


Thursday, February 21, 2013

I'd Forgotten I Made This Card


This was one of the first cards I ever made about 4-5 years ago.  I was sorting through some pictures on Facebook and came across this one.  I love this card even though I made it when I was just an inexperienced, card-making baby.  The colors are so great together, though, aren't they.  How did I manage that?  Seriously, you should see some of the cards I was so proud of at the time.......and can't believe I actually took pictures of.  lol

Promise you won't tell where I got the paper........you'll never believe this.......Dollar Tree......shhhhh!  It'll be our little secret.  Can you believe how cute it turned out with a pack of $1.00 scrapbook paper?  The base paper came from Michael's, but the rest is from the Dollar Tree.  The stamp is from Stampin' Up! I think it was a hostess set, but I'm not sure.  I'm not at home where I can check just now, but I will later and add it in.  :)

Monday, February 18, 2013

Great Little Gift to Have on Hand

Sometimes you want to have a little something to give someone as a thank you or a pick-me-up.  A great gift idea is a mini composition notebook altered with some pretty paper, ribbon and bling.  Everyone needs paper to jot things down from time to time and these are the perfect size to fit into a purse or tote bag.  :)  You can write a special message on the first page so the recipient is always reminded of how important they are to you.  The gift that keeps on giving!


 Some of these little guys came from Walmart and some came from Staples.  I did the one that says "My Notes" a couple of years ago and then "lost" it among my craft supplies during a move one storage area to another.  I can't remember which Cricut font I used, but I think it might be from Lyrical Letters.  The others I made more recently.  I haven't decided if I want to do a stamped label on the ones that don't have anything but bling and ribbon or just leave them as is.  I think they're cute like they are, really.  What do you think?

By the way, the black and white paper is from a Walmart paper pack that I've used before in some of my other posts.  The brightly colored squares and stripes is from Michael's.  The other paper is from Stampin' Up!, but I can't remember the name of it.  I think it was part of a mini catalog collection.

I think I'll share this one at D. L. Art as well...... 


Sunday, February 17, 2013

Totally Stole This Idea!

One of my favorite bloggers is Robyn over at My Pink Stamper.  She did this card awhile back that was just so simple and elegant that I had to do some for myself.  I left off the sentiment so that I could add them later as needed, but here is my version.  If you click on "My Pink Stamper" above, you will be taken to the video tutorial she did.


The paper is Whisper White from Stampin' Up!  I did a 5.5" x 8.5" folded in half card base.  Then I embossed about 3/4 of a 5.25" x 4" piece of Whisper White. I affixed the velvet ribbon (from Hobby Lobby) onto it, using the "cheater method" from My Pink Stamper.  I use my ATG Gun instead of Scotch tape, though.  The flowers are from The Paper Studio at Hobby Lobby.  I bought a package of the black and white and a package of the pretty aqua and then mixed and matched them.  The bling came with the flowers.  I used hot glue to adhere the flowers.  Aren't they pretty?  I just love the ideas she comes up with.  They are so simple and always cute.

I'm linking this to DLART's Thankful Thursday Linky Party.  Go and check out all of the cute projects when you get a minute!  You won't be disappointed.  :)

Thursday, January 10, 2013

Something Pretty for a Sweet Lady

I am linking this project to Use it Tuesday's Challenge #47 "Make it Sparkle."  There is a ton of bling and sparkle in this project so I think it qualifies for sure.  I am also linking it to DL.ART's most recent anything goes Linky Party.  These are two of my favorite challenge blogs.  Check them out.  There are a TON of great projects featured there.  You get so many ideas and meet some new crafty friends along the way.  :)

I just HAD to have this tray when I first saw it at Hobby Lobby almost two years ago.  My hubby and I were on an anniversary weekend away in Daphne, AL (one of my favorite places in my small world), and I had printed out coupons for each of us for each of the 3 days of our stay.  I know.  We're wild and crazy and can't be trusted when we go off together. ;)  lol!  Anyway, I got it.  Then promptly become too intimidated by it to do anything with it.  It has been in my craft room causing all kinds of mischief ever since.  It always seemed to be covering up something that I needed, or sliding off the shelf onto my head when I tried to look for something.  Sometimes, it would be in a place other than where I thought I had left it.  Not as creepy as that weird clown doll in the USPS commercials, but it definitely had to be used.  

There is this sweet lady that works at my school, who lost her mother several years ago.  I got some pictures from her to make a memorial candle and decided to make this as well.  The candle will be in a future post since I am out of wax paper.  

Her mother loved the color burgundy, so I used the Mirabelle mat stack from The Paper Studio.  The papers are SO pretty!
 

 In this frame, I used some great epoxy brads from The Paper Studio that seemed made for this paper stack.  


I cut the letters from a lighter piece of paper from the paper stack and from a Cheerios box.  I used the Mod Podge to adhere the paper and box layers together and sponged the edges with Walnut distress ink.  Then, I spread Crystal Effects by Stampin' Up on it and sprinkled a tiny bit of Dazzling Diamonds over the letters to dress them up just a bit.  This was a first for me, and I'm so happy with how they turned out.


I used the "Faith, Hope, Love" stamp set from Stampabilities on a scrap of paper.  The ribbon is also from The Paper Studio.  (I'm thinking I should be president of their fan club.)  I can't remember the name of the company for the pendant, but I got it from the jewelry section at Hobby Lobby.  I originally did it with Crystal Effects over the picture, but I didn't like it so I pulled it out and redid it with just the picture.  

Sorry about the blurriness.  I didn't notice it until I had already taken the photo tray to school.  This is a scanned copy of something my friend had written on the back of one of her mother's photos.  I was so touched that I decided it needed its own tray.  I printed it on vellum and layered it over one of the papers from the stack.  The lattice punch is one I've had for a month or so.  I was so excited to find that punch and get it 50% off that I came home and punched out a piece of my favorite paper just to see the effect.  Then, I couldn't decide what to do with it so I set it aside to wait for the perfect project.  It was buried under other things, and I stumbled upon it looking for my adhesive eraser.  Perfect project indeed!  The die is from Spellbinders.


This is the most recent photo of my friend's mother.  I embellished with a brass bottlecap that I covered with a circle cut out of the same paper as the tray background.  I stamped the word "adore" and covered with Crystal Effects.  


I think the stamp is from Stampabilities, but I'm not sure.  (Packaging gets in the way so I usually toss it.)  The pearls are from Stampin' Up!


This is a really good picture, but I'm afraid I might have ruined it with too many pearls.  I used permanent adhesive to keep them from falling off in the humidity of our summers so I can't change it.  I hope she doesn't think I over-blinged.  :(
 

 The love my friend had for her mother was so obvious that I thought this sentiment would be perfect.  It's from the "Faith, Hope, Love" setI stamped it in Bravo Burgundy by Stampin' Up!  The tag is from Stampendous "Timeless Tags."  I stamped it in River Rock by Stampin' Up! and then sponged the edges with it as well.  I got the jewel from Hobby Lobby, but I can't remember who it's from.  I refer to it as "big, honkin' bling."

I meant to sponge the edges of all of the pieces with the Walnut distress ink, but I was so nervous and excited about this project when it all started to come together that I forgot until I had most of the pieces adhered down.  Oh well, I think it still turned out pretty.  :)

I hope it brings her comfort and she knows what an impression she has made on the lives of others as a result of her mother's love and nurturing throughout her life.